


ChatGPT and Intelligent Document Processing!!


BERT’s model architecture is based on Transformers. It uses multilayer bidirectional transformer encoders for language representations. Based on the depth of the model architecture, two types of BERT models are introduced namely BERTBase and BERTLarge. The BERTBase model uses 12 layers of transformers block with a hidden size of 768 and number of self-attention heads as 12 and has around 110M trainable parameters. On the other hand, BERTLarge uses 24 layers of transformers block with a hidden size of 1024 and number of self-attention heads as 16 and has around 340M trainable parameters. BERT uses the same model architecture for all the tasks be it NLI, classification, or Question-Answering with minimal change such as adding an output layer for classification.
This article was published as a part of the Data Science Blogathon
Machines understand language through language representations. These language representations are in the form of vectors of real numbers. Proper language representation is necessary for a better understanding of the language by the machine. Language representations are of two types: (i) Context-free language representation such as Glove and Word2vec where embeddings for each token in the vocabulary are constant and it doesn’t depend on the context of the word. (ii) Contextual language representation such as Elmo and OpenAI-GPT where token representation depends on the context of the word where it is used.
The problem with context-free language representation is that the same word with completely different meanings will have the same representation such as the representation of ‘bat’ will be the same for cricket bat or animal. With a contextual model, we get the representation of each token based on the sentence in which that token is used resulting in a better understanding of the language by the machine. The BERT model helps in generating the contextual representation of each token. It is even able to get the context of whole sentences, sentence pairs, or paragraphs.
BERT basically uses the concept of pre-training the model on a very large dataset in an unsupervised manner for language modeling. A pre-trained model on a very large dataset has the capability to better understand the context of the input sentence. After pre-training, the model can be fine-tuned on the task-specific supervised dataset to achieve good results. Two types of strategies can be applied namely features-based and fine-tuning. Elmo uses the concept of the feature-based model where model architectures are task-specific. It uses different models for different tasks and uses a pre-trained model for language representations. BERT uses the concept of fine-tuning and the final model for any task is almost the same as BERT. It uses deep bidirectional layers of transformers encoders for language understanding and hence got the name Bidirectional Encoder Representation from Transformer. The overall idea for the application of BERT can be depicted from the picture shown below.

Image source: Author
BERT’s model architecture is based on Transformers. It uses multilayer bidirectional transformer encoders for language representations. Based on the depth of the model architecture, two types of BERT models are introduced namely BERTBase and BERTLarge. The BERTBase model uses 12 layers of transformers block with a hidden size of 768 and number of self-attention heads as 12 and has around 110M trainable parameters. On the other hand, BERTLarge uses 24 layers of transformers block with a hidden size of 1024 and number of self-attention heads as 16 and has around 340M trainable parameters. BERT uses the same model architecture for all the tasks be it NLI, classification, or Question-Answering with minimal change such as adding an output layer for classification.
The whole input to the BERT has to be given a single sequence. BERT uses special tokens [CLS] and [SEP] to understand input properly. [SEP] token has to be inserted at the end of a single input. When a task requires more than one input such as NLI and Q-A tasks, [SEP] token helps the model to understand the end of one input and the start of another input in the same sequence input. [CLS] is a special classification token and the last hidden state of BERT corresponding to this token (h[CLS]) is used for classification tasks. BERT uses Wordpiece embeddings input for tokens. Along with token embeddings, BERT uses positional embeddings and segment embeddings for each token. Positional embeddings contain information about the position of tokens in sequence. Segment embeddings help when model input has sentence pairs. Tokens of the first sentence will have a pre-defined embedding of 0 whereas tokens of the second sentence will have a pre-defined embedding of 1 as segment embeddings
Final Embeddings used by model architecture are the sum of token embedding, positional embedding as well as segment embedding. The final embeddings are then fed into the deep bidirectional layers to get output. The output of the BERT is the hidden state vector of pre-defined hidden size corresponding to each token in the input sequence. These hidden states from the last layer of the BERT are then used for various NLP tasks.
BERT was pre-trained on unsupervised Wikipedia and Bookcorpus datasets using language modeling. Two tasks namely Masked Language Model (MLM) and Next Sentence Prediction (NSP) were performed. During MLM, 15% of the tokens from the sequence were masked and then correct tokens were predicted at the final hidden state. To capture the relationship between sentence pairs given as input, NSP is used. For NSP, 50% of the data is labeled as isNext where sentence B of the input sequence is just the next sentence of sentence A from the dataset corpus. Another 50% of data is labeled as notNext where sentence B is not next to sentence A but any random sentence from the corpus dataset. Output hidden state corresponding to [CLS] token is used to predict the correct label and compute loss. After pre-training, BERT can be fine-tuned on the specific task-based dataset.

For the implementation of BERT for any task on our dataset, pre-trained weights are available and we can easily use those pre-trained weights to fine-tune the model on our own dataset. The pre-trained weights for BERT are available in the transformers library and we can use that by the following code.
from transformers import BertModel
bert = BertModel.from_pretrained('bert-base-uncased')
Here, “bert” contains the pre-trained model weights for BERTBase. We also need to use the same tokenizer and tokens index mapping using which model has been pre-trained. We can get the tokenizer using the code given below.
from transformers import BertTokenizer
tokenizer = BertTokenizer.from_pretrained('bert-base-uncased')
tokens = tokenizer.tokenize("What's going on?")
Output: [‘what’, “‘”, ‘s’, ‘going’, ‘on’, ‘?’]
Let’s try to fine-tune the pre-trained bert model for the sentiment classification task. The model can be designed just by adding a linear layer at the output hidden state of the [CLS] token.
import torch.nn as nn

class BERTSentiment(nn.Module):
    def __init__(self,
                 bert,
                 output_dim):
        super().__init__()

        self.bert = bert
        embedding_dim = bert.config.to_dict()['hidden_size']
        self.out = nn.Linear(embedding_dim, output_dim)

    def forward(self, text):
        #text = [batch size, sent len]
        embedded = self.bert(text)[1]
        #embedded = [batch size, emb dim]
        output = self.out(embedded)
        #output = [batch size, out dim]
model = BERTSentiment(bert,
OUTPUT_DIM).to(device)
We can then easily train the model using the above model by defining the loss function and optimizer.
optimizer = AdamW(model.parameters(),lr=2e-5,eps=1e-6,correct_bias=False)criterion = nn.CrossEntropyLoss().to(device)
def train(model, iterator, optimizer, criterion, scheduler):
    epoch_loss = 0
    epoch_acc = 0

    model.train()
    for batch in iterator:
        optimizer.zero_grad() # clear gradients first
        torch.cuda.empty_cache() # releases all unoccupied cached memory
        text = batch.text
        label = batch.label
        predictions = model(text)
        loss = criterion(predictions, label)
        acc = categorical_accuracy(predictions, label)
        #torch.nn.utils.clip_grad_norm_(optimizer, max_grad_norm)
        loss.backward()
        optimizer.step()
        scheduler.step()
        epoch_loss += loss.item()
        epoch_acc += acc.item()
    return epoch_loss / len(iterator), epoch_acc / len(iterator)
def evaluate(model, iterator, criterion):
epoch_loss = 0
epoch_acc = 0
model.eval()
with torch.no_grad():
for batch in iterator:
text = batch.text
predictions = model(text)
loss = criterion(predictions, labels)
acc = categorical_accuracy(predictions, labels)
epoch_loss += loss.item()
epoch_acc += acc.item()
return epoch_loss / len(iterator), epoch_acc / len(iterator)We can then use train() and evaluate() function to train the model and to test.
import math
N_EPOCHS = 3
train_data_len = 25000
warmup_percent = 0.2
total_steps = math.ceil(N_EPOCHS*train_data_len*1./BATCH_SIZE)
warmup_steps = int(total_steps*warmup_percent)
scheduler = get_scheduler(optimizer, warmup_steps)

for epoch in range(N_EPOCHS):
    start_time = time.time()
    train_loss, train_acc = train(model, train_iterator, optimizer, criterion, scheduler)
    valid_loss, valid_acc = evaluate(model, valid_iterator, criterion)
    end_time = time.time()
    epoch_mins, epoch_secs = epoch_time(start_time, end_time)
    print(f'Epoch: {epoch+1:02} | Epoch Time: {epoch_mins}m {epoch_secs}s')
    print(f'tTrain Loss: {train_loss:.3f} | Train Acc: {train_acc*100:.2f}%')
    print(f't Val. Loss: {valid_loss:.3f} |  Val. Acc: {valid_acc*100:.2f}%')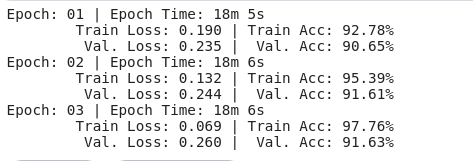
When nothing works, Boosting does. Nowadays many people use either XGBoost or LightGBM or CatBoost to win competitions at Kaggle or Hackathons. AdaBoost is the first stepping stone in the world of Boosting.
AdaBoost is one of the first boosting algorithms to be adapted in solving practices. Adaboost helps you combine multiple “weak classifiers” into a single “strong classifier”. Here are some (fun) facts about Adaboost!
→ The weak learners in AdaBoost are decision trees with a single split, called decision stumps.
→ AdaBoost works by putting more weight on difficult to classify instances and less on those already handled well.
→ AdaBoost algorithms can be used for both classification and regression problem.


-14.png?width=400&name=pasted%20image%200%20(1)-14.png)
-11.png)
-10.png)
-9.png?width=450&name=pasted%20image%200%20(4)-9.png)
.png)
-5.png?width=350&name=pasted%20image%200%20(5)-5.png)


